Launching an Amazon EC2 MPI Cluster
Author: Wes KendallIn the previous lesson, we discussed how to install MPICH2, an implementation of MPI, onto a single machine and verify that it was installed properly. Unfortunately, a single machine does not always provide a realistic environment on which to learn MPI and execute programs. Along with that, many beginners do not have immediate access to a cluster. In order to provide you with the best MPI tutorial experience possible, I describe how to set up your own virtual MPI cluster so that you can execute the site’s tutorial code along with any other parallel code your heart desires.
Getting started with Amazon EC2
Your cluster will use Amazon’s Elastic Compute Cloud (EC2), which allows you to rent virtual machines from Amazon’s infrastructure. To get started with Amazon EC2, go to Amazon Web Services (AWS) and press the “Sign Up” button. You will have to enter your payment information in order to use their services, however, they will only charge based on the services you use.
Note - Be sure to read and understand EC2 pricing before signing up for AWS. At the time of this writing, they offered limited free hours for some machines and also had machines as low as 2 American cents per hour.
After you have signed up for AWS, read the EC2 Getting Started Guide. Familiarize yourself with how to start, access, and terminate different machine instances.
Luckily, a vast understanding of Amazon’s EC2 infrastructure is not needed in order to create and access an MPI cluster. Once you have familiarized yourself with the basics of EC2, proceed to the next step.
Installing StarCluster
The next tool we will use to create our virtual cluster is MIT’s StarCluster toolkit. StarCluster is a set of tools that automates the process of building and accessing a cluster on EC2. Along with launching the cluster, StarCluster also installs OpenMPI (an implementation of MPI) and other software for writing parallel applications.
You will need to install the StarCluster toolkit on your local machine using Python. To do this on Linux/MacOSX, type:
$ sudo easy_install StarCluster
For instructions on how to install StarCluster on Windows, check out the Windows installation instructions.
Configuring StarCluster
After you have installed StarCluster, type:
$ starcluster help
Since StarCluster is not configured, it will print out the following (note that your directories will be different than mine):
StarCluster - (http://web.mit.edu/starcluster) (v. 0.93.3)
Software Tools for Academics and Researchers (STAR)
Please submit bug reports to starcluster@mit.edu

!!! ERROR - config file /Users/wesleykendall/.starcluster/config does not exist

Options:
--------
[1] Show the StarCluster config template
[2] Write config template to /Users/wesleykendall/.starcluster/config
[q] Quit

Please enter your selection:
Enter the number 2 and StarCluster will generate a default configuration file in your home directory under ~/.starcluster/config.
After you have generated the default configuration, obtain your AWS access key, secret access key, and your 12-digit user ID from your AWS account. This information can be located by going to Amazon Web Services, clicking “My Account/Console” in the top-right corner, and then clicking “My Security Credentials.” The link should look similar to this:
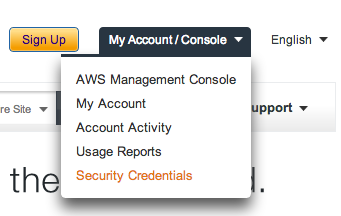
Once on your credentials page, there should be an “Access Credentials” section that has an “Access Key ID” field and a “Secret Access Key” field. At the bottom of the page, there should also be an “Account Identifiers” section with an “AWS Account ID” field.
After finding this information, open your default config file (~/.starcluster/config) with your favorite text editor. Find the line with [aws info] and enter all of your AWS information into the proper fields:
[aws info]
AWS_ACCESS_KEY_ID = # Your Access Key ID here
AWS_SECRET_ACCESS_KEY = # Your Secret Access Key here
AWS_USER_ID = # Your 12-digit AWS Account ID here (no hyphens)
Once this information is entered, save the config file and then create a public/private key pair that will be uploaded to Amazon and used to authenticate your machine when you log into your cluster. Call the following command to generate a public/private key pair with StarCluster:
$ starcluster createkey mykey -o ~/.ssh/mykey.rsa
This creates a “mykey” key on your machine under ~/.ssh/mykey.rsa and also creates a key on your AWS account. If you entered your Amazon credentials correctly, you should see output similar to the following:
>>> Successfully created keypair: mykey
>>> fingerprint: ...
>>> contents:
-----BEGIN RSA PRIVATE KEY-----
...
-----END RSA PRIVATE KEY-----
Next, open your config file again and verify that there is a [key mykey] entry. If the default config file does not have this entry, add the following to your configuration:
[key mykey]
KEY_LOCATION = ~/.ssh/mykey.rsa
The next (and final) bit of configuration involves configuring your cluster parameters. The default config has already defined a cluster named “smallcluster” in the [cluster smallcluster] line of the configuration. It should have the default following parameters:
[cluster smallcluster]
KEYNAME = mykey
CLUSTER_SIZE = 2
CLUSTER_USER = sgeadmin
CLUSTER_SHELL = bash
NODE_IMAGE_ID = ami-899d49e0
NODE_INSTANCE_TYPE = m1.small
A brief overview of the fields are as follows: If you want to start a cluster with more than two nodes, change the CLUSTER_SIZE option. If you have defined a different key (other than our example “mykey”), be sure to add the appropriate key as the KEYNAME field. When you run the cluster, it will automatically generate a CLUSTER_USER username for you that has a home directory mounted over a networked file system (NFS). The NODE_IMAGE_ID is the virtual machine image that comes packaged with all of the cluster software. The final parameter, NODE_INSTANCE_TYPE, determines the size of each node. For a list of available instance types and their attributes, go here.
To determine the cost of running your cluster, multiply the number of nodes by the hourly rate for your instance type. At the time of this writing, the m1.small instance was priced at 6.5 American cents per hour. There is no pro rata for usage. If you run your cluster for thirty minutes, you will be charged for the entire hour.
Note - Although t1.micro instances are the cheapest, they hang indefinitely for me when starting a cluster with StarCluster.
Enable mpich2 plugin for Starcluster
Lastly, before launching Starcluster, enable the mpich2 plugin for Starcluster by following these steps.
Starting, accessing, and stopping your cluster
After your StarCluster is configured, type the following to start a cluster called “mpicluster.” The default config uses “smallcluster” as the default cluster type:
starcluster start mpicluster
The process to start a cluster can take a bit of time depending on your configuration. After the command is complete, StarCluster will print out the available commands for accessing, stopping, and restarting your cluster.
SSH into the manager node of your cluster by typing:
starcluster ssh manager mpicluster
Once you are logged into the cluster, your current working directory will be /root. Change into the /home/ubuntu or /home/sgeadmin areas to compile code. These directories are mounted on a network file system and are viewable by all nodes in your cluster.
While you are in one of the mounted home directories, go ahead and check out the MPI tutorial code from its GitHub repository. The code is used by every lesson on this site:
git clone git://github.com/mpitutorial/mpitutorial.git
After you feel comfortable with accessing your cluster, log out of it and stop your cluster:
starcluster stop mpicluster
A stopped cluster can be started again by typing:
starcluster start -x mpicluster
To terminate a cluster completely, type:
starcluster terminate mpicluster
The difference between a “stopped” and “terminated” cluster is that stopped clusters still reside as images on Amazon’s Elastic Block Store (EBS). If you will not be starting your cluster again in the foreseeable future, it is recommended to go ahead and terminate the cluster since Amazon EBS payment rates apply to stored instances. As always, educate yourself on Amazon EC2 Pricing before getting started.
Ready to run MPI programs on your cluster?
Now that you have your very own cluster, it’s time to start running MPI programs. To get started, check out how to compile and run an MPI hello world application. If you want to try the same by building a local cluster, go through running an MPI cluster within a LAN tutorial. For all lessons, check out the MPI tutorials. If you had any trouble with the lesson, please leave your comment below so that we can try to figure out what went wrong. Happy coding!